Friday, December 30, 2016

Top Ten A Bride On A Budget Posts Of 2016

I'm happy to say 2016 is over.

Last year, I recapped our year and talked about how many special moments there were and how I was holding on to them all, even the mundane ones. And I told a story that I had completely forgot until I reread the post, about my grandma and I going to Waffle House and a man helping her up the curb by grabbing her booty.

And it's making me cry because this year, just six (incredibly long and agonizing) weeks ago, we lost my grandma. I'm so lucky to have had so many moments with her that will live in my heart forever, but my heart aches over the fact that I cannot make any more beautiful memories with her.

I spent the end of 2016 longing to go back to the beginning of 2016, wanting so badly to recapture and relive happier moments.

Your 2016, dear A Bride On A Budget reader, was spent longing for the beginning of 2016 too. I went through our posts to find the most read from 2016. None of them were from the second half of the year. And of our top ten posts this year, only two are from 2016 -- and those are both from January.

So I have two year end wrap up lists. The first is the top ten posts read in 2016 and the second is the top ten posts written in 2016.

If you got engaged recently, you may have missed some of the BEST wedding posts on www.abrideonabudget.com. Go back and check out the top ten here.


Top Ten Posts Read in 2016 on A Bride On A Budget

  1. Wedding DIY: Preserving Your Flowers At Home
  2. Why You Should Always Go Wedding Shopping At The Dollar Store
  3. DIY: Twine-Wrapped Wine Bottle Centerpieces Tutorial
  4. Black Friday Wedding Deals
  5. Who Gets Tipped At A Wedding? (And answers to all your other wedding tipping questions.)
  6. DIY Wooden Letter Guest Book
  7. Food Trucks At Weddings
  8. Bridal Shower Word Search (free printable)
  9. So you're engaged ... now what? (What to do before you say "I Do")
  10. Famous Couples Bridal Shower Game (free printable)


Top Ten Posts Written in 2016 on A Bride On A Budget

Wednesday, December 28, 2016

Monthly Wedding Calendar

There's a scene in It's The Great Pumpkin Charlie Brown where Charlie Brown (because it's always poor Charlie Brown) opens his trick or treat bag and, very discouraged, says, "I got a rock." And I laugh because no matter the holiday, women in long term relationships are always hoping to open a bag and find a rock.

It doesn't often happen at Halloween, though. Christmas kicks off engagement season and from now until Valentine's, Facebook timelines become filled with ring shots and status updates that say, "I said yes!"

If you're one of those girlfriends who said yes, congratulations. There is a lot of super fun planning in your future. Don't get overwhelmed, and don't feel like you have to do everything all at once. You can spread your planing out over the next year or so. You might have a longer engagement (ours was 21 months), so you can spread out some of the beginning activities over a longer time span. For the rest, we've broken it down into monthly tasks ... until wedding month where you will be a little busier.

Planning your wedding? Don't try to do it all at once. Break it down into monthly tasks with this monthly wedding calendar from www.abrideonabudget.com.

For me, I'm visual. I like having printables, so I made that monthly wedding calendar above for people like me. Just right click the image, save it to your computer, and print it out at home. It's formatted to fit on an 8.5x11 sheet of paper.

In case you're more of a read and click person, you're in luck. I typed out the same list below. Anything that I've written a post on is clickable, so you can click those links to get more information.


Monthly Wedding Calendar


12 Months To Go
Set a date
Book a venue/reception site
Book your photographer

11 Months To Go
Make your guest list
Pick a wedding theme
Choose your bridal party

10 Months To Go
Buy your dress, veil, accessories
Order your flowers
Order your cake
Go for a tasting. Choose your menu.

9 Months To Go
Book a band/DJ
Book a limo/shuttle
Block hotel rooms (including yours)

8 Months To Go
Get bridesmaids dresses

7 Months To Go
Order Save The Dates

6 Months To Go
Send Your Save The Dates
Order the groom's wedding band

5 Months To Go
Book hair/makeup
Go to marriage prep/pre-cana

4 Months To Go
Choose tuxes for the groom/groomsmen
Order wedding invitations

3 Months To Go
Send wedding invitations
Start making your centerpieces/decorations

2 Months To Go
Order wedding favors
Plan the rehearsal & dinner
Choose your church readings & readers
Choose ceremony music

1 Month To Go
Create a final headcount
Make a seating chart
Order escort/table cards
Finalize the menu
Order menu cards
Order wedding programs
Purchase thank you gifts

2 Weeks To Go
Get your wedding ring cleaned
Make wedding welcome bags

Wedding Week
Get your marriage license
Get your nails done
Finalize everything

BRIDAL BABBLE: Which monthly wedding calendar method do you prefer?

Monday, December 26, 2016

Doctor Who For Your Something Blue

Have you thought about your something blue? It's such a fun way to incorporate a pop of personality into your wedding. A lot of people hide their something blue -- blue thread stitching your wedding date into the bottom of your dress, blue on your garter belt like I had (which was also my something borrowed) -- but some people go bold.

Be the bold. Especially if you like Doctor Who. The show is so popular right now, so I know a lot of people who want to incorporate it into their wedding. But maybe you don't want a full Doctor Who-themed wedding. I get it. But you should go ahead and use Doctor Who for your something blue. It's fun and easy. I mean, the Tardis is blue. That basically covers you.

I did go through the Internet and found my favorite ideas to use Doctor Who for your something blue. Check out my list below.

Doctor Who fans! Incorporate the smash show into your wedding with these Doctor Who For Your Something Blue ideas from www.abrideonabudget.com.

Doctor Who For Your Something Blue

  1. Doctor Who Tardis Necktie
  2. Doctor Who Tardis Dangle Earrings
  3. Tardis Pendant Necklace
  4. Doctor Who Men's High Top Canvas Sneaker
  5. Doctor Who Cufflinks
  6. Doctor Who Doctor/Companion Bracelets
  7. Doctor Who Hair Clip
  8. Doctor Who Tardis Watch
  9. Doctor Who Tardis Socks
  10. Doctor Who Tardis Bracelet
Just a quick aside: I put together this list because I know a lot of people who love Doctor Who. I'm not affiliated with Doctor Who at all.

BRIDAL BABBLE: Which Doctor Who item would you pick for your something blue?

Tuesday, December 20, 2016

DIY Wedding Invitation Ornament

I'm always looking to ways to preserve wedding memories, especially ones that don't take up that much room. I mean, if it was up to me, I would have every piece of wedding stationery on display in our living room, but that's a little impractical. 

I put together a DIY ornament tutorial to turn your wedding flowers into a Christmas ornament. While I was working on it, I also created a second DIY ornament tutorial: this DIY Wedding Invitation Ornament tutorial.

Looking for something festive to do with your wedding invitation? Turn it into a DIY Wedding Invitation Ornament with this tutorial on www.abrideonabudget.com.

DIY Wedding Invitation Ornament


Now, before we get started, it should be noted that I only have one copy of our invitation for our scrapbook, so I didn't use it. Instead, I used the do not disturb signs I created, but you'll get the idea.

Looking for something festive to do with your wedding invitation? Turn it into a DIY Wedding Invitation Ornament with this tutorial on www.abrideonabudget.com.


What You'll Need:

What You'll Do:

Looking for something festive to do with your wedding invitation? Turn it into a DIY Wedding Invitation Ornament with this tutorial on www.abrideonabudget.com.

Cut the invitation into quarter-inch strips.

Looking for something festive to do with your wedding invitation? Turn it into a DIY Wedding Invitation Ornament with this tutorial on www.abrideonabudget.com.

Wrap them around a pen to curl (I stuck one end under the cap to hold it in place).

Looking for something festive to do with your wedding invitation? Turn it into a DIY Wedding Invitation Ornament with this tutorial on www.abrideonabudget.com.

Put the curled strip into the glass ornament.

Looking for something festive to do with your wedding invitation? Turn it into a DIY Wedding Invitation Ornament with this tutorial on www.abrideonabudget.com.

Continue until the ornament is filled. Then, put the top back on.

Looking for something festive to do with your wedding invitation? Turn it into a DIY Wedding Invitation Ornament with this tutorial on www.abrideonabudget.com.

Tie a piece of ribbon to the top. This is what you'll use to hang it.

This was really simple and just came out beautifully.

This actually would be a really cute idea for when you have kids. You could make one a with your kid's birthday party invitation every year, then give him or her a full set on his or her eighteenth birthday. I would have absolutely loved this, so I'm sure your (future) children will too.

BRIDAL BABBLE: Do you think you could make this DIY wedding invitation ornament?

Monday, December 19, 2016

Sugar Swirl Cookies

If you love this recipe, be sure to Yum it here: Yum

I put a stand mixer on our wedding registry because I wanted to make sugar swirl cookies. I fell in love with them years before we got married, but I never made them because you needed a stand mixer to make the dough. I put a mixer on our registry and, oddly enough, it was the one thing that wasn't purchased off it.

Fast forward two and a half years to Wednesday. That's the day my brothers and their girls shocked me and Pete with a stand mixer for Christmas. Of course, the very first thing I made were sugar swirl cookies.

Looking for a pretty recipe so you can use your stand mixer? Try these sugar swirl cookies from www.abrideonabudget.com.


Sugar Swirl Cookies


Now, I'll be honest. These were pretty time consuming. Making them was easy (using the stand mixer made me feel like I was cheating because it made making the dough so simple!), but it was a lot of refrigerator time.

I'm basing my recipe and method off one from Just A Taste.

What You'll Need:
  • 2 sticks butter
  • 1 cup granulated sugar
  • 2 eggs
  • 2 teaspoons vanilla extract
  • 3 cups flour
  • 1/2 teaspoon baking powder
  • 1/2 teaspoon salt
  • 10 drops food coloring
  • 1 ounce sugar sprinkles

What You'll Do:

Looking for a pretty recipe so you can use your stand mixer? Try these sugar swirl cookies from www.abrideonabudget.com.

Put the butter in the stand mixer and mix it (with the flat blade) until it's broken down.

Add the sugar and beat until combined.

Add an egg. Mix until combined. Add the second egg. Mix again. Add the vanilla. Mix.

Looking for a pretty recipe so you can use your stand mixer? Try these sugar swirl cookies from www.abrideonabudget.com.

Add the flour, baking powder, and salt. Mix until a dough forms.

Turn off the mixer and take out the dough. Form it into a ball, then cut that ball in half.

Put one of the dough ball halves back in the mixer with about ten drops of food coloring. Mix until it's a color you like. If you need it richer, add more food coloring. If you need it lighter, add less.

In an 8x8 pan, stretch out the "white" dough ball half until it fills the entire bottom of the pan, forming a square. Put a piece of plastic wrap on top of it. Make sure the wrap is double the size of the pan itself. You'll see why in a second.

Put the colored dough ball half on the plastic wrap. Spread it out until it fills the entire pan. Now, take that extra wrap and cover the colored dough completely.

Put the pan in the fridge for 30 minutes.

Looking for a pretty recipe so you can use your stand mixer? Try these sugar swirl cookies from www.abrideonabudget.com.

Take out the dough and unwrap the colored square. Use a pizza cutter to cut it in half. Put that half between two pieces of wax paper (trust me on this part. I tried it without a top sheet of wax paper and it was a nightmare). Use a rolling pin to roll it out into a large rectangle about 1/8 of an inch thick.

Cut the white dough in half with a pizza cutter, put it between two sheets of wax paper, and roll it out to be the same size as the colored dough.

Pull a sheet of wax paper off of each, then, carefully, place the white dough on top of the colored dough. Go over it a few times with the rolling pin to make sure to doughs stick together.

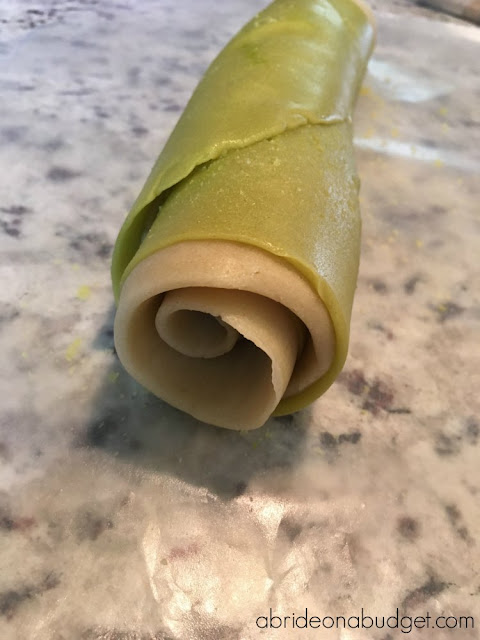
Peel off one sheet of wax paper. Tightly roll the dough into a log. Wrap it in the wax paper, then in plastic wrap.

Follow the last four steps for the second halves of the dough. When you're completely done with both, put the logs in the fridge for an hour.

Take a log out, unroll it, and cover the outside completely in colored sprinkles. Wrap it back up and put it in the fridge for four hours.

Preheat the oven to 350.

Looking for a pretty recipe so you can use your stand mixer? Try these sugar swirl cookies from www.abrideonabudget.com.

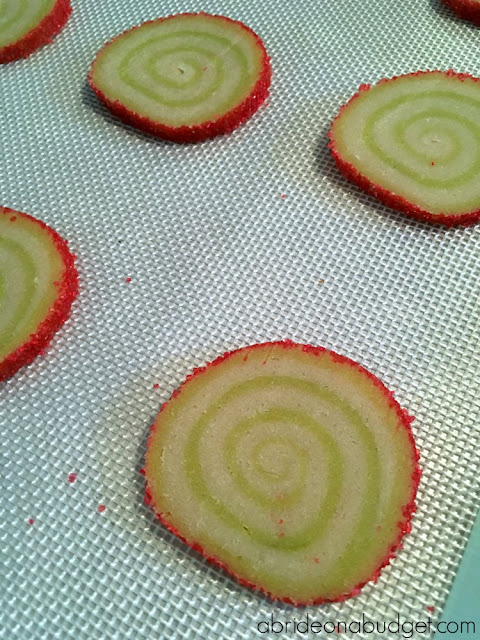
Take the log out of the fridge (for the last time!). Cut it into 1/8 inch slices. I ended up with about 38 slices per log.

Now, since this post is probably inspiring you to register for a stand mixer, I'm going to suggest you also register for two baking mats. They are a dream. You put them on a cookie sheet instead of greasing it, and even the stickiest of cookies just pop right off. 

So put your cookie slices on a baking mat and bake for 11 minutes. Subsequent batches will bake a little less.

Cool them on a wire rack (which is also something we registered for and use all the time).

BRIDAL BABBLE: Would you make these sugar swirl cookies?

Tuesday, December 13, 2016

Hot Chocolate Spoons Favor Idea

Oriental Trading provided most of the items for these hot chocolate spoons. Additional items, and all thoughts and opinions, belong to A Bride On A Budget.

I'm obsessed with chocolate. It's part of why we had a full candy buffet at our wedding and part of why I eat lunch every day (then I can eat chocolate after because, despite my wishes, chocolate is not a meal).

If you like chocolate too, you'll love our hot chocolate spoons favor idea.

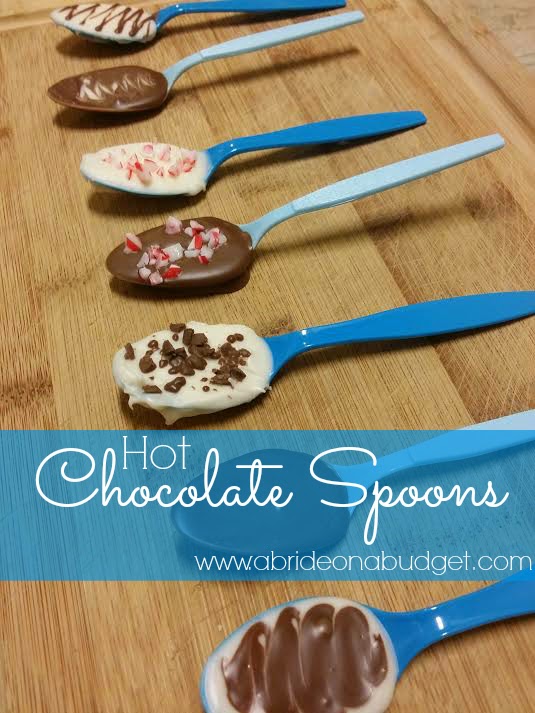
Hot Chocolate Spoons Favor Idea. These are perfect for a winter wedding, a blue wedding, a birthday party, or just something to make on a snowy Saturday when the kids are outside playing. Get the full tutorial on www.abrideonabudget.com.

Hot Chocolate Spoons Favor Idea


These were actually pretty easy to make, but they did make a huge mess. I had bowls and bags and cutting boards everywhere. And I was only making seven chocolate spoons. I can't imagine how my kitchen would look if I was making a hundred or so.

But that's why you turn this into a group activity. Invite your mom and your bridesmaids over. They'll help you make them and help you clean up.

Hot Chocolate Spoons Favor Idea. These are perfect for a winter wedding, a blue wedding, a birthday party, or just something to make on a snowy Saturday when the kids are outside playing. Get the full tutorial on www.abrideonabudget.com.

What You'll Need:

What You'll Do:

Hot Chocolate Spoons Favor Idea. These are perfect for a winter wedding, a blue wedding, a birthday party, or just something to make on a snowy Saturday when the kids are outside playing. Get the full tutorial on www.abrideonabudget.com.

Crush the candy canes. 

Personally, I put them in a plastic bag and beat with a rolling pin until it's crushed. It's the same method I use for breaking down graham crackers too (which you may remember from our chocolate seashell favor post).

Hot Chocolate Spoons Favor Idea. These are perfect for a winter wedding, a blue wedding, a birthday party, or just something to make on a snowy Saturday when the kids are outside playing. Get the full tutorial on www.abrideonabudget.com.

Melt one of the chocolates according to the package. You only want to melt one at a time (either the milk chocolate or the white).

Dip the spoon in the chocolate until it is completely coated. It will stay warm for a while, so you can twist and turn the spoon to make sure it is evenly coated. Lay it on a sheet of parchment paper.

Hot Chocolate Spoons Favor Idea. These are perfect for a winter wedding, a blue wedding, a birthday party, or just something to make on a snowy Saturday when the kids are outside playing. Get the full tutorial on www.abrideonabudget.com.

Embellish with candy cane pieces while it's still warm.

Hot Chocolate Spoons Favor Idea. These are perfect for a winter wedding, a blue wedding, a birthday party, or just something to make on a snowy Saturday when the kids are outside playing. Get the full tutorial on www.abrideonabudget.com.

Or milk chocolate nibs. Or a chocolate drizzle. Or just leave it plain. Whatever you want.

Then, melt the second chocolate.

Hot Chocolate Spoons Favor Idea. These are perfect for a winter wedding, a blue wedding, a birthday party, or just something to make on a snowy Saturday when the kids are outside playing. Get the full tutorial on www.abrideonabudget.com.

Dip those spoons.

Now, the light blue spoons I received don't lay as nicely as the turquoise spoons. The light blue spoons laid forward, which meant all the chocolate tried to slide off the spoon. To combat this, I actually rested them on bags of mini marshmallows because they were handy.

Hot Chocolate Spoons Favor Idea. These are perfect for a winter wedding, a blue wedding, a birthday party, or just something to make on a snowy Saturday when the kids are outside playing. Get the full tutorial on www.abrideonabudget.com.

If you're feeling adventurous (and you have a little of each chocolate left over), you can mix them. Have one chocolate as the base flavor. Carefully flood the middle of the spoon with the second chocolate, then use a toothpick to swirl the two together.

Hot Chocolate Spoons Favor Idea. These are perfect for a winter wedding, a blue wedding, a birthday party, or just something to make on a snowy Saturday when the kids are outside playing. Get the full tutorial on www.abrideonabudget.com.

These are hot chocolate spoons, which means they're intended to be used to make hot chocolate. So of course, I had to try.

I used the solid chocolate spoon. I heated up some milk (in the owl mug you may recognize from our wedding registry; I told you I'm obsessed with it), started stirring the milk with the spoon, and the chocolate melted enough to fall off the spoon. I stirred it in and had a great tasting mug of hot chocolate.

Hot Chocolate Spoons Favor Idea. These are perfect for a winter wedding, a blue wedding, a birthday party, or just something to make on a snowy Saturday when the kids are outside playing. Get the full tutorial on www.abrideonabudget.com.

The hot chocolate spoons with the candy canes will make a mint hot chocolate, which is great and always popular. If you had a high quality sea salt, you could make salted hot chocolate spoons (which would probably be my favorite, now that I think about it).

If your guests don't drink hot chocolate (the horror!), they can add these hot chocolate spoons to coffee and make a mocha. That sounds delicious too.

When these have dried completely, you can package them in favor bags tied with white curling ribbon. Your guests will absolutely love them!

BRIDAL BABBLE: Which of these hot chocolate spoons do you think you would like best?

Wednesday, December 7, 2016

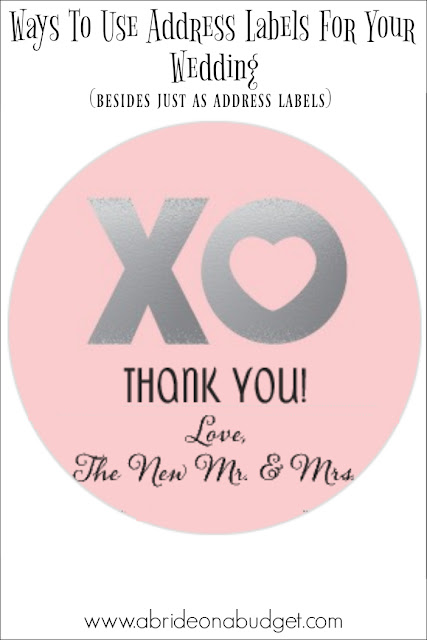
Ways To Use Address Labels For Your Wedding (Besides just as address labels)

There's a hot deal going 'round the internet today. If you check your email, you may have gotten one from Tiny Prints with the title: Your $50 Holiday Gift is Here! Look inside and there's a code for $50 off a $50 order.

If you're like me and love free stuff, you're in luck.

Address labels at Tiny Prints are as low as $8 a sheet and wrap around labels are $10 a sheet. Five sheets is $50 ... and that's free after your $50 code.

You have a ton of options for these if you're like me and have a personalized return address stamp that you're planning to use for all of your stationery.

You don't always have to use address labels as address labels. Check out these cute alternative uses for address labels for your wedding from www.abrideonabudget.com.

Consider labels for your favors. You can personalize them with any text, so instead of adding your address, just add a little thank you text. Perfect.

You can look at the Valentine's Day category and find a ton with hearts and "XO" on them, which would be perfect for any of our ideas below.
You don't always have to use address labels as address labels. Check out these cute alternative uses for address labels for your wedding from www.abrideonabudget.com.

Ways To Use Address Labels For Your Wedding (Besides just as address labels)

  • Create ones that say "Happy Trails" then affix them to trail mix for an easy DIY favor, like we did here.
  • Make these cute ones for your bridal shower favors.
  • Use them to close your save the date cards, invitations, or thank you cards instead of stickers.
  • Create return address labels to use them on the front of your RSVP cards.
  • Create wrap around labels with your wedding date for your save the date envelopes (you can see our wrap around labels here).
  • Use them as calendar stickers to add with your save the dates so your guests can stick them on the calendar.

You can make whatever you want. Actually, you can. The code will work on any products at the Tiny Prints website, but address labels are the bet use of your code, if you're asking me. Whatever you choose, you have to make it by 11:59pm PST on December 8 when the code expires or you will lose out.

BRIDAL BABBLE: What creative alternative uses for address labels do you have?