Monday, September 29, 2014

How To Store The Top Tier Of Your Wedding Cake (so it tastes great a year later)

The end of our wedding reception is more of a blur than the wedding itself. Nearly all our guests traveled, so they almost all took the shuttle we rented back to the hotel after the ceremony ended. Pete and I were left, carless, at the venue. We had a room in the resort for the night and I knew we could get a ride back home in the morning, but I never thought about all the items that we would actually have after the wedding. We had leftover favors, miscellaneous centerpiece items, two guitars, and gifts that had to go somewhere ... somewhere that wasn't our honeymoon suite.

Two of our friends, who live in our town, were amazing and took all of our stuff back to their house.

Including the top tier or our wedding cake.

I really thought storing the top tier was simple. I thought you put it in the freezer and took it out a year later and had it on your first anniversary. Simple. 

Oh no. There's a process to it.

How To Store The Top Tier Of Your Wedding Cake

Our friends did ours for us (small aside: If you read our post Five Things No One Tells You About Your Wedding Day, number four was that you need that one random friend who will help you at the end of the night, after your parents and bridal party have retired from their duties. These friends were those friends) so I don't have any personal experience doing this. But I do have instructions from the bakery we used: Imaginary Cakes. Their instructions are paraphrased below:

How To Store The Top Tier Of Your Wedding Cake

  • Remove the cake topper and any big decorations from the top tier of the cake. Any edible decorations can be left.
  • Freeze the cake in the freezer for an hour. This hardens the icing so it doesn't stick to anything later in the process.
  • Remove from the freezer and wrap in plastic wrap. Cover the cake in its entirety, making sure its covered from the top to bottom and all sides. This wrap should be airtight.
  • Double wrap the cake with aluminum foil. This makes sure there's no taste of freezer burn.
  • Put the wrapped cake in a box.
  • Place the box (with the cake inside) in a freezer-safe tight container, plastic bag, or a garbage bag.
  • Leave the cake in the freezer for a year.

The Day Before Your Anniversary

  • Take the bag from the freezer and place in the fridge overnight.

The Day Of Your Anniversary

  • Remove the cake from the fridge and let it thaw for 30 minutes before serving.
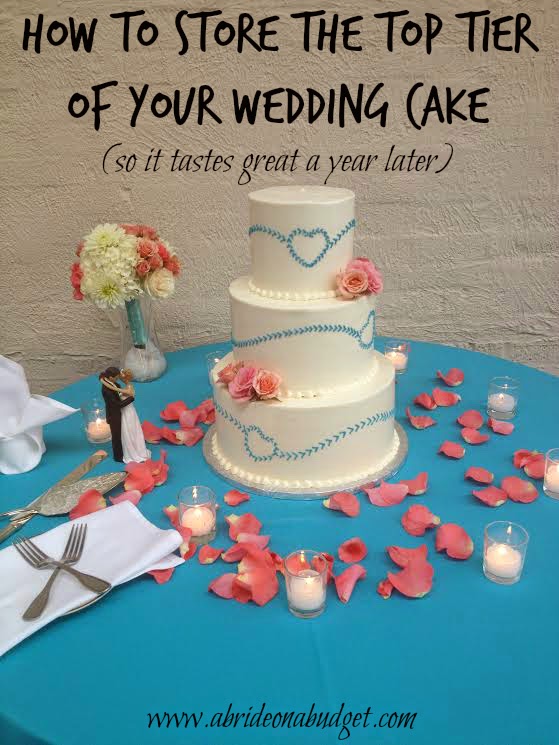
The cake above, that's my friend Susan's baseball cake from her wedding last weekend. It was delicious, in case you were wondering. If you want to check out a photo of my cake, there's one in this post.

BRIDAL BABBLE: Do you plan on saving the top tier of your wedding cake?

Wednesday, September 24, 2014

How To Write A Check For A Wedding Card (And guarantee it gets deposited)

This is a touchy post, one I put off writing because this is a fun blog with DIY projects and budget saving tips. It's not an etiquette blog. But the more I put it off, the more I thought about posting it.

When you get a gift, you have to be grateful for it. As the bride and groom, you are inviting people to your wedding for their presence, not their presents. It is absolutely not a requirement of your guests to give you any gifts. If they do, that's very nice of them. And if they don't, that's okay.

If you're a guest and you decide to give a check to the couple, here's my etiquette tips: Write it out to the bride using her maiden name, write it out to the groom, or write it out to cash.

Find out how to write a check for a wedding card and guarantee it gets deposited in this post from www.abrideonabudget.com.

I know, you probably want to write it out to the bride with her new last name. But here's the thing: You don't know if the bride is changing her name and if she is, you also don't know when. Most suggest not changing your name until after the honeymoon so that travel documents and ID match in your maiden name. You can legally change it after then.

But if the bride takes her time changing her name or doesn't at all (like me!), and a check is written out to Mr. & Mrs. Husband's Last Name, well, that Mrs. doesn't exist. And that makes it very hard to cash a check.

Pete and I opened a joint account after our engagement party so our wedding money would go in that account where either of us could make deposits. At my bridal shower, someone wrote a check to Mr. & Mrs. Pete's Last Name. Let's give him the last name of Jones because that will make it easier for the rest of this post. So they wrote the check to Mr. & Mrs. Jones.

My shower was six months before the wedding. My last name was mine, not his. In fact three months after the wedding, my last name is mine, not his. Because his name was on the account and because it was low value compared to the rest of my deposit, the bank allowed me to deposit the check ... after authorization from a supervisor. After the wedding, though, the majority of our checks were made out to Pete & Lisa Jones. But Lisa Jones, that person doesn't exist. And I have no intention of her existing in the immediate future. Maybe when we have kids, but we'll visit that then. For now, Pete can't RSVP and say the attendees are, "Me and Mrs. Jones."

So, anyway, I took Pete with me to the bank when I was making a deposit after our wedding. I didn't want a hard time. We got there and immediately had an issue with the names on the checks. The ones in my name were fine, the ones in Pete's name were fine, but the 75% or so with this imaginary wife were a problem. Not only did the teller have to call a supervisor, the supervisor had to call someone and talk to them for a very long time to get authorization for our deposit.

It was enough time for me to reflect on the times when I had written checks for weddings and wrote them to the bride and groom with the groom's last name. I never gave it a second thought ... until I was in the bank. Now, all my checks are getting made out to cash or I'm just giving cash. A hold up at the bank teller is a minor annoyance, but a new couple should be blissfully entering into their new life. I don't want to be the cause of any annoyance for them.

BRIDAL BABBLE: Are your plans to change your last name when you get married?

Tuesday, September 23, 2014

DIY: Broquet (Make a groomsmen gift in minutes)

It's so hard to think of thank you gifts for groomsmen, especially if you don't want to stick with the typical alcohol drinks. Engraved flasks, personalized pint glasses, bottles of liquor that are usually suggested when you google groomsmen gift.

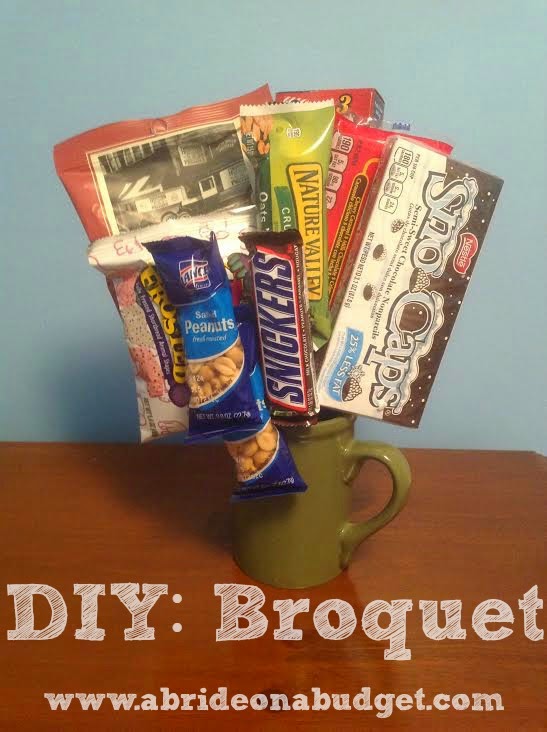
If you want something delicious for your groomsmen, make a broquet.

Yes, broquet. It's a bouquet ... for bros.

broquet

It's really easy to DIY a broquet. You can put them together in a handful of minutes and they're really eyecatching. Plus, you can personalize them for each groomsmen.

broquet

Broquet


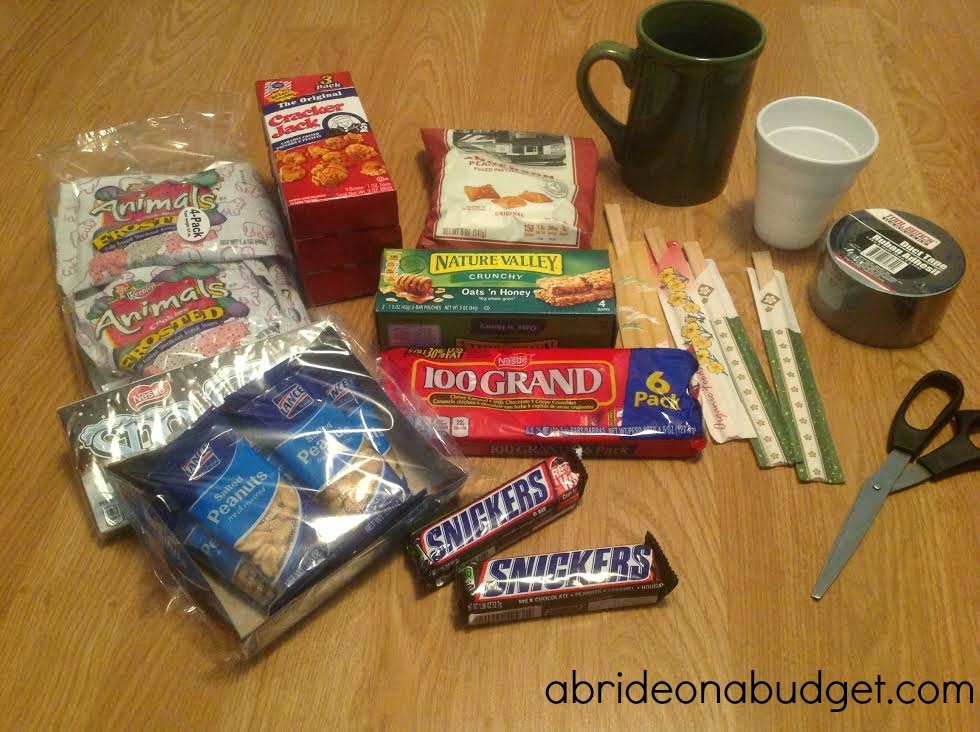
What You'll Need:
  • Heavy mug (the heavier the better because it needs to offset the weight from the snacks)
  • Duct tape
  • Scissors
  • Styrofoam cup
  • Chopsticks (you could use skewers instead, but they might be a little long)
  • Snacks (I bought: animal crackers, Sno Caps, Cracker Jacks, filled pretzels, Nature Valley granola bars, 100 Grand chocolate bars, and Snickers bars)

What You'll Do:

broquet

Squeeze one Styrofoam cup, upside down, into the heavy mug.

broquet

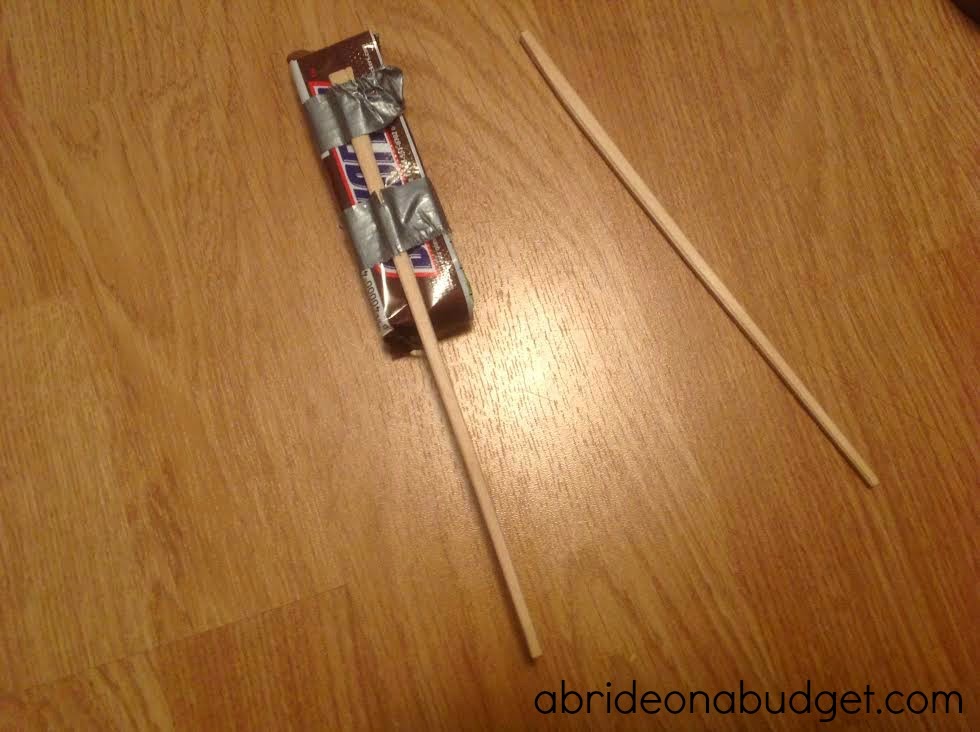
Duct tape the snacks to a chopstick.

broquet

Stick the chopstick either into the cup or into the space between the cup and mug. You'll want to vary where you stick these based on size and weight (big heavy stuff goes in the back, short light stuff goes in the front).

What worked best for me was sticking them all on the chopsticks and then arranging them. I had originally tried to do them one at a time, but in the time it took to duct tape a second chopstick, the first item would lean. It was a pain in the neck. When I did it all at once, everything was able to lean on everything else and I could really arrange it better. This is so solid and I have no fear of anything leaning and dragging down the rest of the broquet.

It's so easy. This broquet cost me $10 to make and I grabbed everything (even the duct tape) at the dollar store. The more you make, the cheaper each will be. Why? Take an item like the peanuts. There were six in the pack I bought, but only two packages really fit in the broquet. So for $1, you can make three. The animal cookies had four in a pack; the Cracker Jacks were three in a pack; the Nature Valley granola bars were two in a pack. Spread those over multiple broquets and you are spending less.

The mug I used comfortably held eight chopsticks worth of items. You have to keep in mind that some of the items are bulky (like the filled pretzel bag I bought) so it will take up more space.

Imagine having a bunch of these all lined up for your groomsmen. They will be really eyecatching and your groomsmen will absolutely love all the snacks. What guys don't love food?

BRIDAL BABBLE: What would you add to this broquet for your groomsman?

Thursday, September 18, 2014

Disney Is Making A Frozen Wedding Dress (Check out the sketch!)

I've never seen Frozen. I know the song "Let It Go" is very popular among little kids, but I've never heard it in its entirety. In fact, the only time I've really heard the song is when my Facebook friends post videos of their kids singing it.

No kids, so I've been living in a a Frozen-free zone.

I know the girls are Anna and Elsa and one of them wants to build a snowman. Small aside: Do they build a snowman? Anyone know? Because I don't. I also don't know if anyone actually finds Nemo in Finding Nemo because I fell asleep before the ending and never decided to finish it.

These are questions I probably need answered before we decide to have children. But the question I need answered right now is: Would you want to wear a Frozen-themed wedding dress?

Frozen-Wedding-Dress
Photo credit

Disney Weddings is pairing with designer Alfred Angelo to create a Frozen wedding dress as part of the 2015 Disney Fairy Tale Weddings by Alfred Angelo collection.

Now, before you hit pause on this idea because it sounds a little extreme, this collaboration isn't being started just for Frozen. The 2014 collection has dresses with a style for all your favorite princesses: Cinderella, Jasmine, Snow White, Tiana, Sleeping Beauty, Ariel, Rapunzel, and Belle. I'm in love with this Cinderella dress, which looks nothing like the blue dress I remember her wearing in the movie.

The rumor is the Frozen wedding gown will actually be blue, which is something I'm not completely a fan of. I love white dresses, can accept ivory dresses, and wouldn't try on anything colored. I did see a bride-to-be fall in love with a green Vera Wang dress while I was dress shopping, so it's definitely a style for some people. I'm just not that person.

The Disney wedding dresses on the site run between $999 and $1,399, which is a lot less than some of the boutiques I went into when I was dress shopping. The James Clifford that I originally liked was $2,700 if I bought the sample. So these Disney bridal gowns are pretty reasonable. Plus, you can pair them with the Disney Princess engagement rings everyone was gaga over not too long ago.

BRIDAL BABBLE: Would you wear a blue wedding dress?

Wednesday, September 17, 2014

DIY Tissue Paper Tassel Garland (Make in minutes! No gluing or sewing needed!)

When we were looking at wedding venues, I knew I wanted one that was "move in ready." I didn't want something that I had to do a lot to. I wanted a venue that does weddings all the time and had the decor to back it up. I didn't want to rent tables, I didn't want to worry about napkins, I didn't want to think about recessed lighting.

We picked a venue on the beach (instantly the "outside" was taken care of) that has sixty-odd weddings a year. There was a lot we didn't have to do, as far as decor goes, and I was super happy with that. See, everyone in our bridal party lives up north, so it was just me and Pete down here in North Carolina putting everything together. And decor that I would have created would have been made on an assembly line of two, so I opted against any DIY decor.

But yesterday, my Twitter friend Sarah asked if I had a photo of a tassel garland. I didn't ... but I also didn't think it could be that complicated to put together. So I grabbed some twine and tissue paper and my assembly line of two (although I swapped Pete for my kitten Totes) to see what I could do. To my surprise, I had one for her in a handful of minutes.

Make a tissue paper tassel garland in minutes without gluing with this tutorial from www.abrideonabudget.com.

I was actually shocked at how easily this came together. It took me about ten minutes, start to finish, and that included taking these step by step photos and chasing away my very curious cat. Plus, there's no gluing or sewing involved with this tissue paper tassel garland, which makes it so much easier.

Make a tissue paper tassel garland in minutes without gluing with this tutorial from www.abrideonabudget.com.

DIY Tissue Paper Tassel Garland


What You'll Need:
What You'll Do:


Make a tissue paper tassel garland in minutes without gluing with this tutorial from www.abrideonabudget.com.

Fold your tissue paper into six to eight sections (depending on the size of the paper).

Make a tissue paper tassel garland in minutes without gluing with this tutorial from www.abrideonabudget.com.

Cut it into strips.

Make a tissue paper tassel garland in minutes without gluing with this tutorial from www.abrideonabudget.com.

Fold a strip in half, then cut strips about two-thirds of the way up. Remember to cut from the "open" side of the paper. Four strips (so three cuts) was the perfect size for me.

Make a tissue paper tassel garland in minutes without gluing with this tutorial from www.abrideonabudget.com.

String the "folded" side onto a piece of twine.

Make a tissue paper tassel garland in minutes without gluing with this tutorial from www.abrideonabudget.com.

Scrunch the top of the tissue paper, then twist to create a "knot.' I twisted one and a half rotations and it felt really secure. It's been hanging all afternoon and I haven't worried about any tassels falling down.

Make a tissue paper tassel garland in minutes without gluing with this tutorial from www.abrideonabudget.com.

Repeat with another piece until your tissue paper tassel garland is complete. It took seven tassels to cover 23 inches of space, if you're looking for numbers. From knot to knot is about two inches, give or take. I liked that because it gives the bottom of the tassels enough room to billow out and not get cramped and lost. Plus, if you have them right on top of each other, you'll use more tissue (which means it will cost you more).

I rotated between purple and white (because that's what I had on hand). You could make yours all one color, all mutli-colored, whatever fits your theme best. I actually love how it looks hanging up in our living room.

I sent the photo to Sarah, and she turned it into a cute photo (so of course, I had to post it).

Make a tissue paper tassel garland in minutes without gluing with this tutorial from www.abrideonabudget.com.
For something I just threw together in my spare minutes while I was waiting for my coffee to brew with items I already had lying around at home, I'm pretty impressed. DIY isn't as intimidating as you might think.

BRIDAL BABBLE: What decor items are you going to try to DIY?

Tuesday, September 16, 2014

Five Things You Can Borrow (Instead Of Buy) For Your Wedding

The easiest way to save money on your wedding is to just not spend it. I get it, that sounds pretty ridiculous because there's no such thing as a free wedding. Even the cheapest of weddings requires you to pay for a marriage license. But still, hear me out. If you want to save money, don't spend it. And you can not spend it by borrowing.

Chances are, you're not the first person you know who is getting married. And if you are, there's a good chance you're not the first person to have a reception at the venue of your choice. So borrow from your friends, borrow from your venue, borrow from anyone who is offering because the more you can borrow, the less you have to buy.

Now, there are some things you definitely don't want to borrow, like a wedding dress. Most brides want their very own, one that hasn't already gone through a wedding night. But there are a few things that you can definitely borrow (or at least try to borrow) to save your budget.

things-to-borrow-for-your-wedding

Here -- in order of your wedding day, not order of significance -- is my list of five things you can borrow (instead of buy) for your wedding.

Five Things You Can Borrow (Instead Of Buy) For Your Wedding


things-to-borrow-for-your-wedding

1. Bridal Accessories

I will never in my life wear a garter belt again. The only reason I wore one this time was so Pete could throw it (and, as you can see in the photo above, so my brother could put it on his girlfriend's leg). I was super lucky that my friend Nicole offered me hers to borrow because I didn't need to spend money on one but I did need something borrowed. Plus, she actually used hers as her something blue (if you look close, you can see the blue in it), so I was able to use it as my something blue also.

I did buy my veil -- which I absolutely loved more than I can explain -- but I also lent it out after my wedding. So I didn't get to save money on that personally, but I did get to save another bride money.

And then, of course, don't forget about bridal jewelry. Many brides will borrow something from their mom or grandmother for their wedding day, so that means you don't have to go out and spend money on jewelry. Plus, you'll feel really special saying I do wearing a piece from your family.

Savings: around $420 ($20 for the garter, around $150 for the veil, and around $250 for a complete set of bridal jewelry)

church

2. Church decor.

When we met with a florist and were listing out the items we wanted in our package, I mentioned that our church had huge calla lilies on the doors one Easter and I thought they were gorgeous. I asked the florist how much those might be. "Actually," she said, "your church has beautiful white wreaths that it puts out on wedding days. You can probably just ask them for those." When we met with the priest, I asked him and he said that the church puts those out, unless the couple doesn't want them.

Yes, we wanted them. And since these were something the church provided, they were definitely the right size to fit the large church doors. I didn't have to worry about a florist guessing the correct size and being off -- making them either too large or too small for the doors. We didn't have to pay any extra to use these, so we could forget about that expense.

Savings: at least $240 (that's my approximation for what the wreaths may have cost us; your savings will depend on what you can borrow.)

3. Program holders

I could have gone to the dollar store to buy baskets to hold our wedding programs, And that would have cost me two dollars. And in real life, two dollars is basically nothing. But when you're planning a wedding, two dollars saved is huge. So when we were talking to the priest about programs (and he was absolutely set on the fact that we needed them), he said he had matching baskets that we could use to hold our programs.

What's nice is that I actually see these baskets at mass every week. I had never noticed them before, but they catch my eye every week now. And it's just nice to see them and be reminded of our wedding every Sunday. And to be reminded of the couple bucks we saved because the priest mentioned he had them.

Wherever you get married, there's a good chance there has a been a wedding before you. And they probably had programs because most weddings do. So ask your venue if they have a basket you can use to hold them. Chances are they do.

Savings: $2 (plus tax)

wedding programs

4. Centerpieces

We really lucked out in this department.

I wasn't sure what I wanted for centerpieces and Pinterest was letting me down. I knew I wanted something with sand and vases and maybe floating candles. But other than that, I was kind of lost. I knew I didn't want floral centerpieces because one) it wouldn't go with our beach theme and two) floral centerpieces are really expensive.

When we had our tasting at the venue, the on-site coordinator asked me our plan for centerpieces, and I basically paraphrased the above paragraph. She asked me to hold on a moment and came back with the centerpiece in the top photo in this post. She said they host dinners at the venue sometimes and that's what they use for centerpieces, then told me we could use them for free. Perfect. Done. That's our own rock sand in the centerpieces (we got that from the beach behind the house in the Outer Banks where Pete's family stays each summer) and the seashells are ones I collected on the beach down in North Carolina last summer. The portions I added were free (and made them our own) and use from the venue was free. That saved us a ton of money ... and potential aggravation. I mean, if we had bought that for all the tables, we would end up with eleven mirrored plates, thirty three small votive holders, and eleven hurricane glass vases. We absolutely did not need any of that. And yes, most guests do take the centerpieces from weddings, but the majority of our guests traveled from New York to our wedding. They weren't going to be taking these vases in their carry ons, so I was so happy to have gotten to borrow them from the venue.

So before you start buying items for your centerpieces, ask your venue. You might end up with exactly what you wanted for absolutely nothing out of pocket.

Savings: between $50 and $100 per table, on average (ten tables and that's around $500 savings if you go with the low end of floral centerpieces.)

borrow-instead-of-buy-for-your-wedding


5. Cake Knife & Server

You do not need to bring your own cake knife to your wedding, unless your venue specifies that you do. Chances are the reception venue has had couples cut the cake before and has a knife you can use. Done. Simple. Easy.

We brought our own Reed & Barton bridal set, and it was pretty and great and something I thought would be nice to pass down to our own children one day. It came in a nice padded box and would have kept well for decades until our children -- who do not even exist in our plans right now -- were old enough to get married. We were gifted it so it wasn't something that we spent money on, which was great because the box that the set came in never got returned to us from the venue. So it's something we can pass on, but it's just not as nice. And who knows. Maybe our kids won't even have cakes to cut at the wedding. Is it worth it to buy a cake knife to use for a few photos and then keep in a drawer for decades? No. Just borrow one from the venue. That works just as well.

Savings: about $45

Total savings from these items: at least $1,200 -- and that's my safe, fairly average approximation of things. Imagine how much you could get if you spent that $1,200 elsewhere. Just don't spend it on anything from my list of the five things you can absolutely skip at your wedding or your savings will be in vain.

BRIDAL BABBLE: What else can you borrow instead of buy for your wedding?

Saturday, September 13, 2014

My Wedding Invitations (And a bunch of photos of them)

I had such a hard time finding our wedding invitations. I didn't know what I wanted originally, but I knew what I didn't want. I absolutely refused to order something simple. I didn't want anything that looked like it came in a package. For some people, that's okay. In fact, it's really traditional and the way most people go.

It just wasn't what I wanted.

For months I looked online, on Pinterest, anywhere I could for inspiration. And one night, around 4am, it hit me: I wanted plane tickets. Our wedding was a destination wedding for everyone but us. About 95% of the people we invited were traveling.

But what I wanted ... it didn't exist somewhere where I could just order. Thank goodness for Nicole at Glossie, the absolute best designer I've ever met. If you remember her, we featured her stationery designs in this post, and she also designed our logo. But, today, we're talking about our invitations.

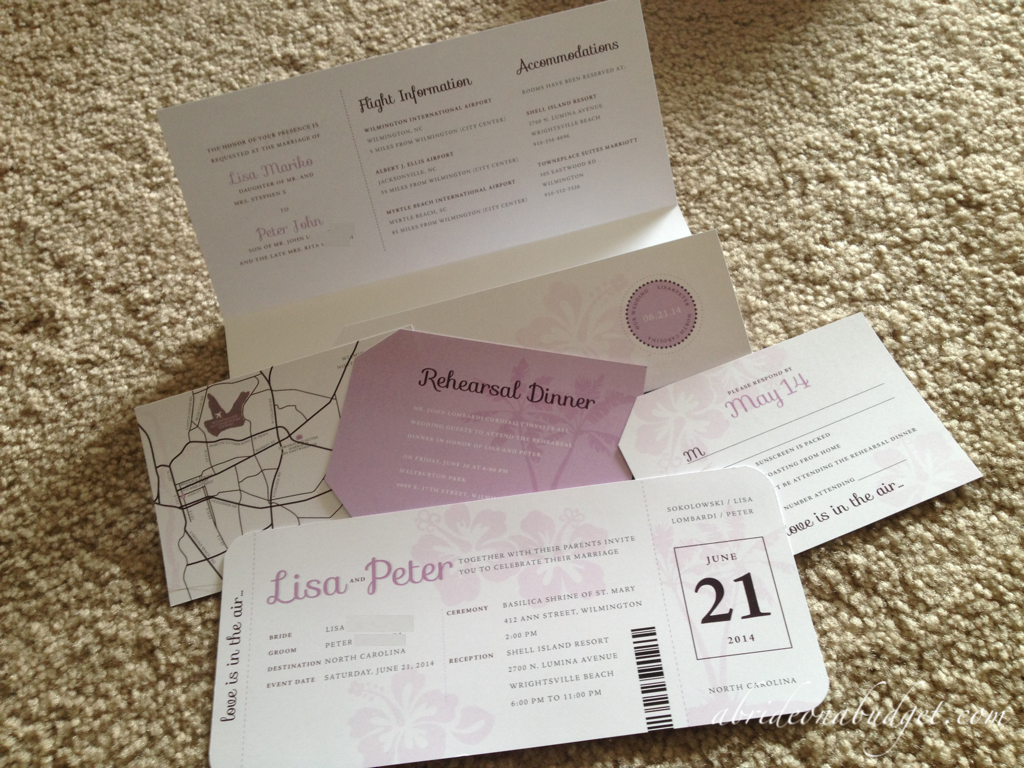
plane-ticket-wedding-invitations

It's not that she just designed one component. Oh no. She designed us a plane ticket for the major part of the invitation, a ticket jacket for the additional information, an RSVP card and rehearsal dinner invitation in the shape of luggage tags, and a map (because I decided I wanted a map instead of directions).

Nicole worked all hours of the night on these. Literally. Since I blog full time, I'm up working at crazy hours. So when I would take a break from working around 2am, I would shoot Nicole an email to ask her to change something.

Because that was me. I'm a pain in the neck client. I'll be honest about that.

See, in life, I always have a lot of ideas, but none ever go together. So I'm sorta very scatterbrained at the beginning. I was lucky that I was able to give Nicole a pretty solid idea at the start ... but then I wanted changes. Once I saw it coming together, it would help my ideas solidify and I'd ask her to change something.

From start to finish, I'm pretty sure it took a month. She sent me the files and I had them printed at OfficeMax.

plane-ticket-wedding-invitations

I went to the store and was handed a closed box. The cashier told me I could open it to check and see that everything came out the way I wanted.

Honestly, I was scared to open it. The files looked great online but there was a chance they wouldn't meet my ridiculous expectations when I had them in my hand. And I wanted, no needed, them to be perfect.

I lifted the top and breathed a sigh of relief. They were perfect. Better than perfect. They were exactly what I had dreamed they would be.

That's when the real fun started.

plane-ticket-wedding-invitations

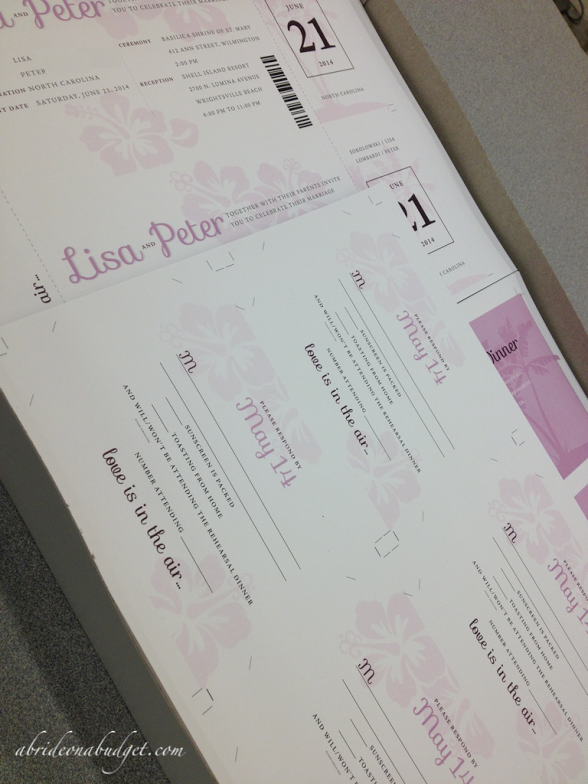
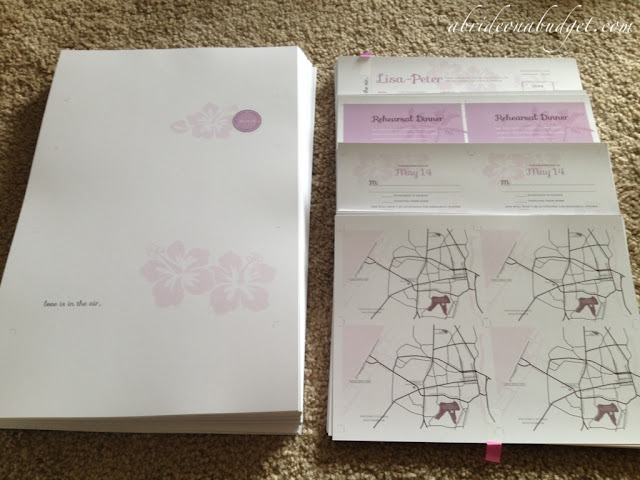
I had 112 or so of each component printed on either 8x10 or 11x17 paper. The holders were one each on the large paper, there were two tickets per 8x10, and then the RSVP cards, maps, and rehearsal dinner invitations were four to a page on the smaller paper. What was awesome is that Nicole set up the files that way, so I didn't have to figure out anything before sending them to be printed. She also put cut lines on the file so I was able to figure out exactly where to cut once I had the pages.

plane-ticket-wedding-invitations

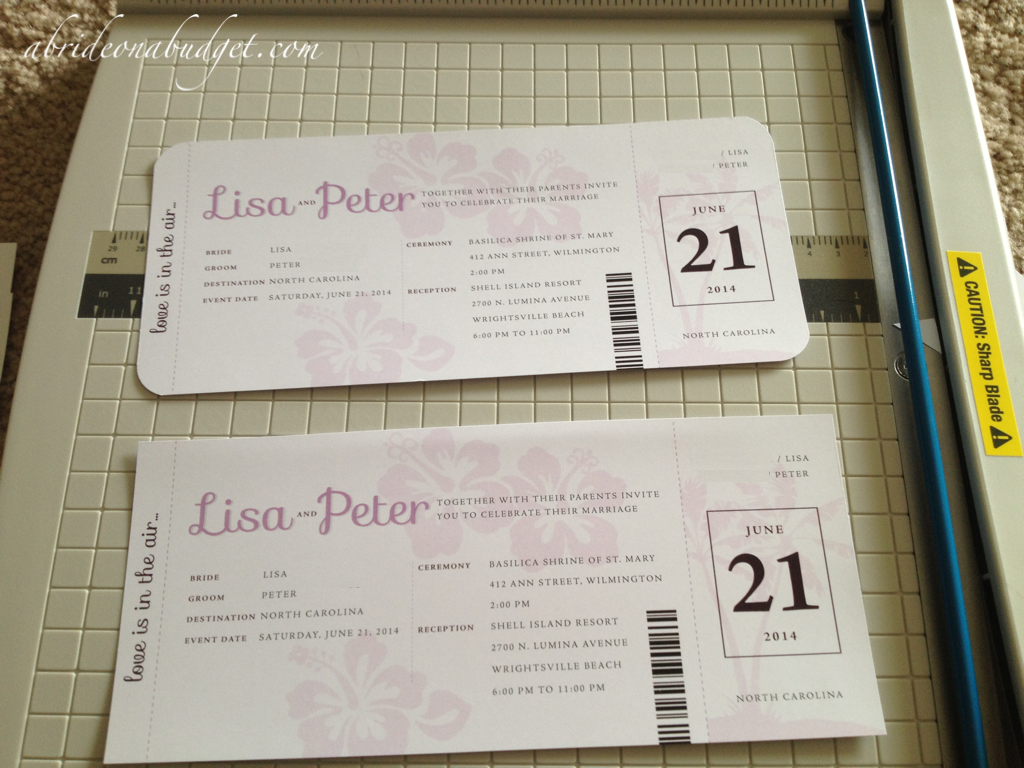
And then I had to chop. And chop. And chop. It took me 12 hours total to cut the components with a paper trimmer. I split it into three sessions because there's no way that I could sit hunched over for half a day straight.

When I was finally done cutting (with only one casualty, believe it or not), it came time for me to decide about how much more intense I wanted to be.

plane-ticket-wedding-invitations

I used a corner rounder, then sent my mom the photo above. I asked her what she thought was better: the one with rounded corners (which actually looks like an actual boarding pass) or if I could just leave the corners squared because it was easier.

She told me that if I could get the corners exact, I should round them. But if I couldn't be exact, I was going to make a mess of my invitations.

What she didn't know is I had a EK Corner Rounder (which is my favorite tool ever).

plane-ticket-wedding-invitations

You stick the corner in and push down, and the corner is rounded and uniform every time. So that's what I went with. It took extra time, but it made the invitations look so much more professional. And that's what I needed. After having them professionally designed, I wasn't going to drop the ball on my execution.

And that's a good lesson about DIY. I always encourage people to only DIY what you can actually pull off. If you start to DIY something to save yourself money and you can't actually do it, you'll end up costing yourself money. And, my biggest rule of thumb was if I DIY'ed something, I didn't want it to actually look like I made it myself. Cutting corners on, well, cutting corners would have done just that.

The truth is, I didn't DIY these. I couldn't. I tried but the level they needed to be at far exceeded my skills on MS Paint and PicMonkey.com. I tried for a little while before realizing there was no way I could pull it off. So I didn't. I went with Glossie, and it is impossible for me to be happier with our finished invitations.

(Small aside: I know there are parts of the invitations that look blurry and imperfect. That's where I blurred out our last names and other information. There aren't any imperfections on the actual invitations.)

BRIDAL BABBLE: What's a DIY project you decided to scrap?

Friday, September 5, 2014

Bridal Shower Gift Idea

I get asked about gift ideas at least once a week. Sometimes, you just don't want to write another check to the bride and groom. Because, let's be honest: weddings can get expensive for guests. If a couple has an engagement party, a bridal shower, and then a wedding, that's three parties, three cards, three checks.

When people ask me about how much to give for each occasion, there's my simple rule of thumb. Take what you want to spend and give 25% at the engagement party, 25% at the shower, and 50% at the wedding. So if you have $200 you can give the couple, that's $50 at the engagement party, $50 at the shower, and $100 at the wedding. If there's no engagement party, follow a 25/75 rule (25% at the shower, 75% at the wedding. So with that $200 budget, spend $50 on a shower gift and $150 at the wedding).

But, honestly, I'm gonna suggest that you don't just write checks every time. For the wedding, yes, that's custom. But for the shower, I always encourage gifts over cards. A couple will register and this is when it's customary to purchase a gift off the registry. But sometimes, you want to add your own twist to a gift.

If you do this right, it can be amazing. My friend Jordan, she gave us one of the most useful bridal shower gifts. So of course, I had to take photos (of, well, most of it).

Bridal Shower Gift Idea

We registered for the Real Simple triple laundry sorter and she purchased that off of our registry. But she didn't stop there. She bought us items that we didn't register for -- but were completely useful.
She bought a laundry basket (which Pete actually needed) and filled it with laundry items (she filled it with purple tissue paper too, which I thought about saving and reusing since that was our wedding color, but they ended up getting tossed).

Bridal Shower Gift Idea

Everything she put in the basket is incredibly useful. She filled it with:
Now, you can choose whatever you'd like, but definitely use her items as a guide. She got everything you need for laundry, which is ridiculously practical. And the practicality of it is what makes it such an amazing gift. See, when you're wedding planning, a lot of your money is going towards your wedding. You plan a budget based on the amount of money you have saved and/or can save by the big day. When you set a date, you stop going out to dinner and stop buying new clothes. You buy groceries because you have to eat, but you won't let yourself spend money on anything that's not a necessity. Laundry products, yes, they're a necessity, but they can be expensive (and, if you live in an apartment complex like we do and have to pay $3 to wash and dry a load, it adds up). So to just say, "Hi Bride. I'm paying for all your laundry products for the rest of the time you're a Miss" ... it's fantastic.

And it's one of those gifts that I'll remember too. For a long time (and every single time I use them). Just like the mugs and note we received.

Plus, what was great is we live in North Carolina but my bridal shower was in New York. So Jordan sent the laundry sorter to our address in North Carolina, but brought this bridal shower gift idea with her to the shower. She attached a photo of the laundry sorter to this gift so we knew she got it, but I didn't have to figure out how to pack it in the car to drive it back home with everything else. So smart.

If you're looking for a bridal shower gift idea, you can shop from the couple's registry. Or, like my friend Jordan, you can shop from the registry and from your own imagination to create a great gift. A little creativity can go a long way.

BRIDAL BABBLE: What's the best bridal shower gift idea you've thought of?